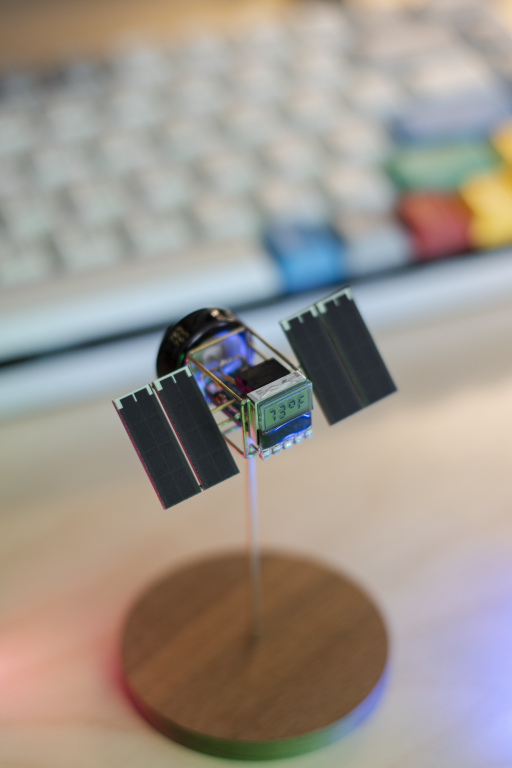
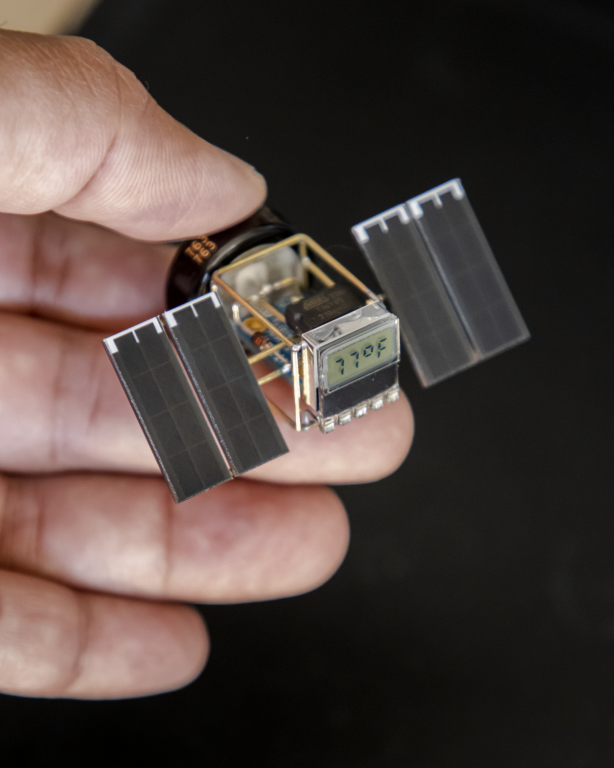
Satellite 2202
Last updated: 23 Sept, 2023

I've been playing with the idea of making tiny free-formed circuit sculptures in the shape of a satellite for a while now. I built a few LED blinkers before, but this time I wanted to build something that did more than just blink an LED.
I recently came across a small low power LCD module with a built-in driver and controller that communicates over I2C. Most LCD modules out there are bare LCDs without the driver or controller, and the ones that have built-in drivers are too big. This particular one seems to be a perfect odd duck.
So I decided to build a "satellite" around it using an ATtiny85 microcontroller and SHT31 sensor. The four solar cells connected in parallel charge a small supercapacitor. The MCU periodically wakes up, takes a sensor measurement, displays the reading, and then goes to sleep to conserve power.
(*some of the product links include Amazon affiliate links)
Parts List
- ATtiny85
- Four KXOB25-02X8F-TR solar cells
- A diode with low forward voltage drop.
- Adafruit SHT31 sensor breakout board or this one
- 4 digit LCD module
- 1.0F 5.5V supercapacitor (or 3.8V 50F hybrid supercapacitor for longer run times)
- 20 AWG brass rods
Schematic Diagram
The schematic is simple. The LCD and the sensor are connected over I2C. No pull-up resistors are required since the sensor board already has them built-in, but if yours doesn't, you'll need to add them externally. The four solar cells are connected in parallel and they charge the supercapacitor via a reverse polarity blocking diode. You can use any small diode with low forward voltage drop.

I would recommend first assembling the circuit on a breadboard. For programming the ATtiny85, I used Pololu's AVR programmer. You can also use an Arduino UNO to act as a programmer instead.


Construction
(I failed to take photos during the build process with my DSLR, so here are some quick phone photos instead.)
I used a small proto PCB to align the joints. Once I soldered the sensor, I removed the proto PCB and replaced it with the LCD module.


The device can also directly power up from the solar cells alone in direct sunlight.
Firmware
The code requires a couple of device libraries:
- SHT31 sensor library from Adafruit
- CDM4101 library for the LCD.
Ensure that you have them installed via the Arduino IDE.
//
// Project link: https://www.bhoite.com/sculptures/satellite-2202/
//
#include "Adafruit_SHT31.h"
//#include <TinyWireM.h>
//#include <USI_TWI_Master.h>
#include <avr/sleep.h> //Needed for sleep_mode
#include <avr/wdt.h> //Needed to enable/disable watch dog timer
//Following is the header file for the LCD module bought on ebay
//Seller link https://www.ebay.com/itm/284843842249
//Information on the LCD http://www.hexpertsystems.com/LCD/
#include <cdm4101.h>

int ctr=1000;
CDM4101 LCD;
char data[25];
int temperature = 0;

bool displayToggle = 0;
uint8_t loopCnt = 0;

Adafruit_SHT31 sht31 = Adafruit_SHT31();

void setup()
{
  pinMode(3, INPUT_PULLUP);
  pinMode(4, INPUT_PULLUP);
  pinMode(5, INPUT_PULLUP);
  pinMode(1, INPUT_PULLUP);
  ADCSRA &= ~(1<<ADEN); //Disable ADC, saves ~230uA
  // put your setup code here, to run once:
  //TinyWireM.begin();
  Wire.begin();
  sht31.begin(0x44);
  LCD.Init();
  LCD.DispStr("sat6");
  delay(1000);
  set_sleep_mode(SLEEP_MODE_PWR_DOWN); //Power down everything, wake up from WDT
  sleep_enable();
}

//This runs each time the watch dog wakes us up from sleep
ISR(WDT_vect) {
  //watchdog_counter++;
  displayToggle=!displayToggle;
}

void loop()
{
  setup_watchdog(9); //Setup watchdog to go off after 8sec
  sleep_mode(); //Go to sleep! Wake up 8 sec later

  int temperature = (sht31.readTemperature()*1.8)+32;
  //int temperature = sht31.readTemperature();
  int humidity = sht31.readHumidity();
  if (displayToggle)
  {
  //insure that the temperature is in a valid range
    if ((temperature <110) && (temperature > -20))
    {
      sprintf(data,"%doF",temperature);
      LCD.DispStr(data);
    }
  }

  else
  {
  //insure that the humidity is in a valid range
    if ((humidity <101) && (humidity > 0))
    {
      sprintf(data,"%drH",humidity);
      LCD.DispStr(data);
    }
  }
}

//Sets the watchdog timer to wake us up, but not reset
//0=16ms, 1=32ms, 2=64ms, 3=128ms, 4=250ms, 5=500ms
//6=1sec, 7=2sec, 8=4sec, 9=8sec
//From: http://interface.khm.de/index.php/lab/experiments/sleep_watchdog_battery/
void setup_watchdog(int timerPrescaler) {

  if (timerPrescaler > 9 ) timerPrescaler = 9; //Limit incoming amount to legal settings

  byte bb = timerPrescaler & 7;
  if (timerPrescaler > 7) bb |= (1<<5); //Set the special 5th bit if necessary

  //This order of commands is important and cannot be combined
  MCUSR &= ~(1<<WDRF); //Clear the watch dog reset
  WDTCR |= (1<<WDCE) | (1<<WDE); //Set WD_change enable, set WD enable
  WDTCR = bb; //Set new watchdog timeout value
  WDTCR |= _BV(WDIE); //Set the interrupt enable, this will keep unit from resetting after each int
}